ROAD

Endurance

E12
D13

Super Light

SL12

MOUNTAIN

Full-Suspension MTB

F12

Hardtail MTB

H13

GRAVEL

Gravel

G13

Bike-Tailoring

Contact Us

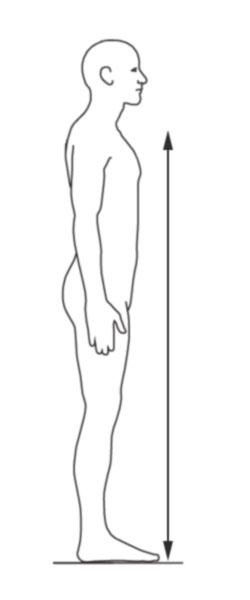
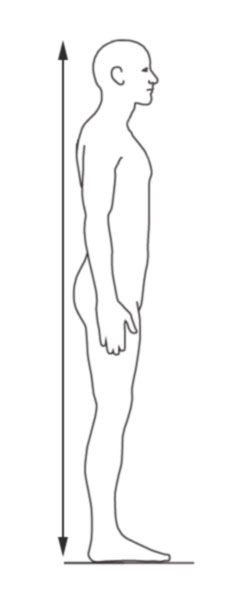
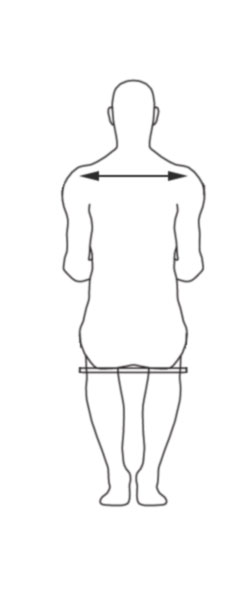
GRAVEL Fitting System


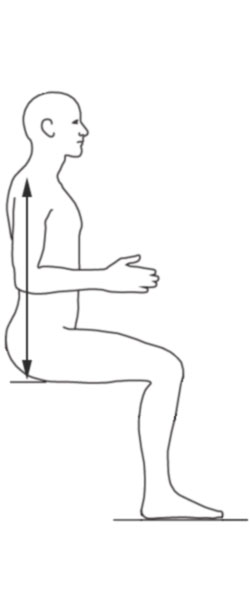
Please follow along with the fitting guide located in this form. Much of this form is required to get the most accurate results. If you have any issues with this form please contact us for additional support.

If you would like to submit a fallible document to our fitting time please use this link.
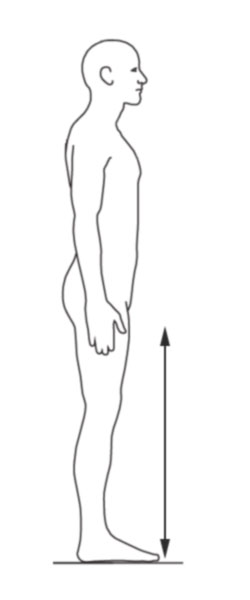
Client Information
Client Details
Your Requested Specifications

Inseam & Height

Wear your cycling shorts, and take the following measurements in bare feet. All measurements should be taken while standing against a straight wall. Set your feet approximately 8inches apart. Record all of your results in the BIKE Fitting Sheet.


Snug up a level in your groin and aim for the same amount of pressure on your crotch as you feel when sitting on your bike seat. Take your measurement when the level is plumb. Measure from the top of the level to the floor in front of you.

Find the sternal notch in your neck; this is the location where your two collar bones meet. Aim for a few cm below the lump in your throat and where the top of your chest begins. Measure the distance from the top of the notch to the floor.

Standing with your back on the wall, use the level to find the highest point on your head and adjust till plumb. Make sure that the level is touching the wall as well. Now measure from the bottom of the level to the floor.

Shoulder, Upper and Lower Arm

Use your level to hold while you take the following measurements. You will stand and sit for the next measurements.


Standing tall, free from the wall, relax your arms at your sides. Have someone measure the distance between your left and right acromioclavicular joint (or AC joint). The AC Joint is located at the end of your clavicles (the opposite direction of the sternal notch), and is easiest to find on the tops of the shoulders.

From the sitting position (this must be conducted on a flat bench using a wall as a backrest), Hold the level in your hand, making a fist. Lower your arm so that it is to your side. Bend your elbow to 90 degrees extending your forearm ahead of you. Keep the object in your hand perpendicular to your forearm, and measure from the furthest knuckle to the boney protrusion at your elbow pivot.

Standing tall with your back against the wall and the level in your hand, make a fist. While your shoulder blades are resting against the wall, raise your arm at the shoulder, extending your forearm ahead of you. Your arm should be parallel to the ground. The level should be perpendicular to your arm. Measure from the furthest knuckle to the AC Joint in the shoulder. Measure both arms and take the average.

Torso, Upper and Lower Leg

These measurements will be from the seated position (this must be conducted on a flat bench using a wall as a backrest). Your back must be straight with your shoulder blades and pelvis pushed hard against the wall. Your femur (thigh) must be parallel to the ground, and your knees are at a 90-degree angle. Use a level to take the following measurements


Place the level across the front of both of your kneecaps. Measure from the inside (the part of the level touching your knees) to the wall. Measure from sides and average the measurements.

Place the level across the top edge of your kneecaps where they connect to the bottom of your inner quadriceps muscles. Measure from the bottom of the level to the ground.

Locate your Acromioclavicular joint (or the AC Joint). Place the level from the top of your AC to the wall ensuring the level is plumb. Measure from the bottom of the level to the top of the bench. Repeat this for both left and right sides and average the measurements.

Submit Your Data

Once your data is submitted our team will get to work starting the process to design your dream bike

The data that you transmit to us via the forms on our website will not be passed on to third parties unless permitted under data protection law. For more information please visit our Privacy Statement

BIKE Fitting System

Welcome to CS | Cycling-Sport's BIKE Fitting System

This system is the starting point for your custom ride.

This process should take about 15 minutes to complete. Be sure you have your Bike Fitting sheet ready to note your measurements.

You will need to provide these items to complete the BIKE Fitting Sheet:

- WaterLevel
- Tape Measure
- Flat Surface (for Sitting)
- A Marker & Pen

To get the most accurate results, we suggest having a partner with you to aid in the measurements.

Introduction

Please fill out the "Client Info" Section

If there is information missing our team will not complete the fitting system report.

Requested Bike Type
Refers to the bike that you are interested in acquiring
Conponent Brand
Refers to the components you would like fitted to your bike
Rim/Tire Notes & Color and Paint
Please note what you are interested in

Inseam & Height

Instructions
Wear your cycling shorts, and take the following measurements in bare feet. All measurements should be taken while standing against a straight wall. Set your feet approximately 8" apart. Record all of your results in the BIKE Fitting Sheet.

Inseam Measurements
Snug up a level in your groin and aim for the same amount of pressure on your crotch as you feel when sitting on your bike seat. Take your measurement when the level is plumb. Measure from the top of the level to the floor in front of you.

Sternal Notch Measurement
Find the sternal notch in your neck; this is the location where your two collar bones meet. Aim for a few cm below the lump in your throat and where the top of your chest begins. Measure the distance from the top of the notch to the floor.

Total Height
Standing with your back on the wall, use the level to find the highest point on your head and adjust till plumb. Make sure that the level is touching the wall as well. Now measure from the bottom of the level to the floor.

Shoulder, Upper and Lower Arm

Instruction:
Use your level to hold while you take the following measurements. You will stand and sit for the next measurements.

Shoulder Width
Standing tall, free from the wall, relax your arms at your sides. Have someone measure the distance between your left and right acromioclavicular joint (or AC joint). The AC Joint is located at the end of your clavicles (the opposite direction of the sternal notch), and is easiest to find on the tops of the shoulders.

Forearm Length
From the sitting position (this must be conducted on a flat bench using a wall as a backrest), Hold the level in your hand, making a fist. Lower your arm so that it is to your side. Bend your elbow to 90 degrees extending your forearm ahead of you. Keep the object in your hand perpendicular to your forearm, and measure from the furthest knuckle to the boney protrusion at your elbow pivot.

Arm Length
Standing tall with your back against the wall and the level in your hand, make a fist. While your shoulder blades are resting against the wall, raise your arm at the shoulder, extending your forearm ahead of you. Your arm should be parallel to the ground. The level should be perpendicular to your arm. Measure from the furthest knuckle to the AC Joint in the shoulder. Measure both arms and take the average.

Arm

Torso, Upper and Lower Leg

Instructions:
These measurements will be from the seated position (this must be conducted on a flat bench using a wall as a backrest). Your back must be straight with your shoulder blades and pelvis pushed hard against the wall. Your femur (thigh) must be parallel to the ground, and your knees are at a 90-degree angle. Use a level to take the following measurements.

Thigh Length
Place the level across the front of both of your kneecaps. Measure from the inside (the part of the level touching your knees) to the wall. Measure from sides and average the measurements.

Lower Leg Length
Place the level across the top edge of your kneecaps where they connect to the bottom of your inner quadriceps muscles. Measure from the bottom of the level to the ground.

Torso Length
Locate your Acromioclavicular joint (or the AC Joint). Place the level from the top of your AC to the wall ensuring the level is plumb. Measure from the bottom of the level to the top of the bench. Repeat this for both left and right sides and average the measurements.

Submit your Results

You have now completed the measurement form.

Please scan or take a picture of your document and send it to us at:

eMail Now

Additional Information
If you need any help or additional information, please contact us at +49000000000000